These Brilliant Tips Will Make Drywall Work Easier and Faster
These Brilliant Tips Will Make Drywall Work Easier and Faster
Introduction
Drywall installation can be challenging, especially when handling large sheets, aligning edges, and creating smooth joints. However, with the right techniques and a little preparation, you can make the job easier, faster, and more professional. Whether you’re renovating a room or finishing a new wall, these practical drywall tips will help you reduce waste, avoid common mistakes, and achieve cleaner results.
Step 1 — Plan Your Drywall Sheet Layout
One of the most important steps in drywall installation is planning where each sheet will go before attaching it to the wall.
What to do:
Measure the wall carefully before cutting any drywall.
Position drywall joints over wall studs whenever possible.
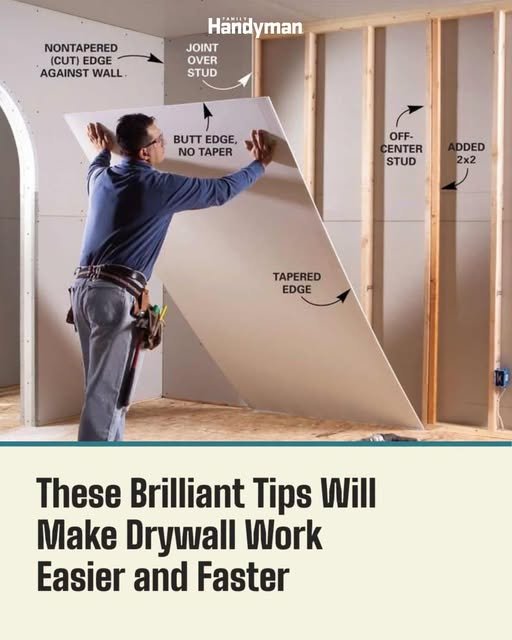
Place factory-tapered edges together to make finishing joints easier.
Avoid unnecessary joints and small drywall pieces.
How to do it:
Start by measuring the wall from corner to corner. Plan your sheet placement so that vertical and horizontal joints align with the framing. When working near corners, position cut edges against the wall corner where practical, rather than creating unnecessary joints in the middle of the wall.
Common mistake to avoid:
Never leave drywall edges unsupported. Every joint should have proper backing, such as a stud or additional framing, to prevent movement and future cracking.
Step 2 — Position Drywall Edges Correctly
Correct edge placement makes a significant difference in the final appearance of your walls.
What to do:
Understand the difference between tapered edges and butt edges before installing drywall.
How to do it:
Tapered edges: These factory-recessed edges are designed to meet each other, creating space for joint compound and tape.
Butt edges: These are flat, non-tapered edges that meet without a recessed area. They require careful finishing to create a smooth surface.
Cut edges: Whenever possible, place cut edges against corners or other locations where they are less noticeable.
Joint placement: Keep drywall joints centered over studs or properly installed backing.
For butt joints, avoid placing them together at the same height on opposite sides of a wall when practical. Staggering joints can also help improve the overall installation.
Common mistake to avoid:
Do not force two uneven edges together. Make clean cuts and ensure the drywall is properly supported before fastening.
Step 3 — Use Proper Framing and Additional Support
Sometimes, standard wall framing does not provide enough support for every drywall joint. Adding extra backing can make installation much easier.
What to do:
Inspect the framing before hanging drywall and identify areas that need additional support.
How to do it:
Check that studs are properly aligned and securely fastened.
Add suitable wood blocking where drywall edges would otherwise remain unsupported.
Use additional framing around openings and difficult corners when needed.
Check that electrical boxes and other wall openings are positioned correctly.
Proper support helps prevent loose edges, movement, and cracks that may appear after finishing.
Tips for Better Results
Here are seven practical tips to make your next drywall project easier and faster:
Tip 1: Measure Twice, Cut Once
Always double-check measurements before cutting. This reduces wasted material and unnecessary repairs.
Tip 2: Use a Sharp Utility Knife
A sharp blade produces cleaner cuts and makes drywall easier to handle.
Tip 3: Keep Factory Edges Together
Whenever possible, join tapered factory edges to create recessed joints that are easier to tape and finish.
Tip 4: Leave a Small Gap at the Floor
Keep drywall slightly above the finished floor to help prevent moisture absorption and damage.
Tip 5: Use the Correct Drywall Screws
Choose screws appropriate for the drywall thickness and framing material. Follow the manufacturer’s recommended spacing and installation guidelines.
Tip 6: Avoid Overdriving Screws
Screw heads should sit slightly below the drywall surface without breaking the paper facing. Damaged paper can weaken the fastening.
Tip 7: Prepare Before Hanging
Have your measuring tape, utility knife, drywall screws, drill, T-square, and lifting equipment ready before starting.
FAQ
1. What is the best way to install drywall?
The best approach is to plan the sheet layout, secure every edge to proper framing, use the correct fasteners, and finish joints with quality tape and compound.
2. Should tapered edges or butt edges go together?
Factory-tapered edges should generally meet each other because their recessed profiles make joint finishing easier. Butt edges require additional care and wider feathering.
3. How often should drywall screws be installed?
A common guideline for standard 1/2-inch drywall on wood framing is approximately 12 inches apart on ceilings and 16 inches apart on walls, but always follow applicable building codes and manufacturer instructions.
4. Can I install drywall myself at home?
Yes! DIY drywall installation is possible with proper measurements, suitable tools, safe lifting practices, and careful attention to framing and fastening.
5. What should I avoid when installing drywall?
Avoid unsupported joints, uneven cuts, overdriven screws, poorly aligned sheets, and unnecessary gaps between panels.
Conclusion
Drywall installation doesn’t have to be complicated or time-consuming. By planning your sheet layout, positioning tapered and butt edges correctly, and adding proper support where needed, you can achieve stronger walls and a smoother finish. These simple techniques can save time, reduce material waste, and make your next home improvement project much easier. For more helpful renovation advice, check out our related guide on essential drywall finishing techniques and professional wall repair tips.